
 |
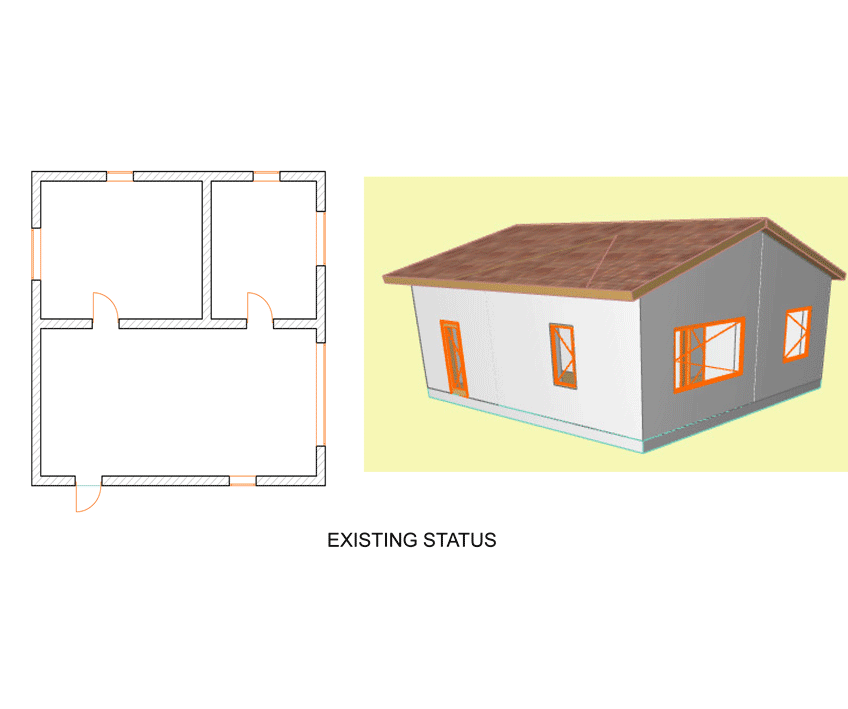
| Renovation Project Example |
Basically when you are using the Phases tool (Revit) / Renovation tool ArchiCAD for renovation project, there are three features you need to pay attention to inside these tools.
1. Project Phase (Revit) / Renovation Status (ArchiCAD).
2. Phase Filters (Revit) / Renovation Filters (ArchiCAD)
3. Graphic Overrides (Revit) / Renovation Overrides Styles ( ArchiCAD)
1. PROJECT PHASE (Revit) / RENOVATION STATUS (ArchiCAD).
You can treat this as the state of each elements in your building in terms of existence. When working on renovation projects, you will normally have some elements already existing on site, probably some elements you want to remove or replaced in the future and some new elements you want to add to the existing ones. So the first rule is that all the elements in your project must be drawn in the correct Status/Phase or they must be assigned to the correct Status / Phase. So how can you do that ?
For ArchiCAD users: There are three Statuses namely;
- Existing Status,
- To be demolished Status,
- New Status.
To open the Renovation Tool, Go to Window - Palettes - Click on Renovation. A small box will appear. You can keep this box on the screen because you will need it quite frequently.

- Select the Status first by clicking on the status icon and model your building elements in this view(Recommended). To set the Existing Status for existing building, simply draw the building while the "Existing Status Icon " is checked. See the example below.

- Select the parts you want to demolish and and hit the second icon " To be demolished". You might not see any difference after assigning elements to "To be demolished" but trust me ,ArchiCAD will remember that the object will be demolished. We only need to tell ArchiCAD how we want the object to display in our views which I will explain later. See example below

To add new Elements to the existing building
Due to the default Renovation filter setting in ArchiCAD , if you draw something new in this view and press the third icon which stands for "New Status" whatever you have drawn will disappear, I will explain why is that later but to keep things simple, change the Renovation Filter to"05 Planned Status" in the drop down menu , then press the "New Status Icon"and start drawing the new elements .
- Note: when you change the renovation filter to Planned Status, all the elements assigned to be demolished disappeared. Don't worry , you will understand the whole magic soon.

For Revit Users: By default , there are two Project Phases namely;
- Existing
- New Construction.
to open the Phase tool , Go to Manage - Click on Phase
You can add new phase if needed but under normal circumstances, you do not really need additional phase, you can work your way around these two phases.
.jpg)
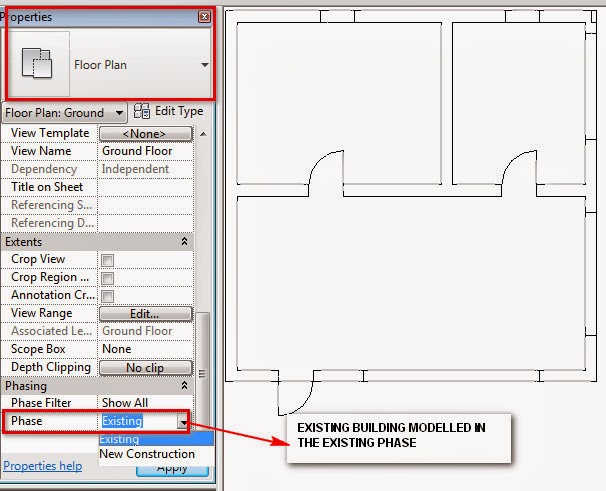
To put your elements in the right Phase in Revit;
- In the View Properties Palette under Phasing , click in the box in front of Phase and choose the right Phase from the drop down menu before you start modelling your building elements(Recommended).
.jpg) |
| Selecting Phase Option in the View Properties Palette |
.jpg) |
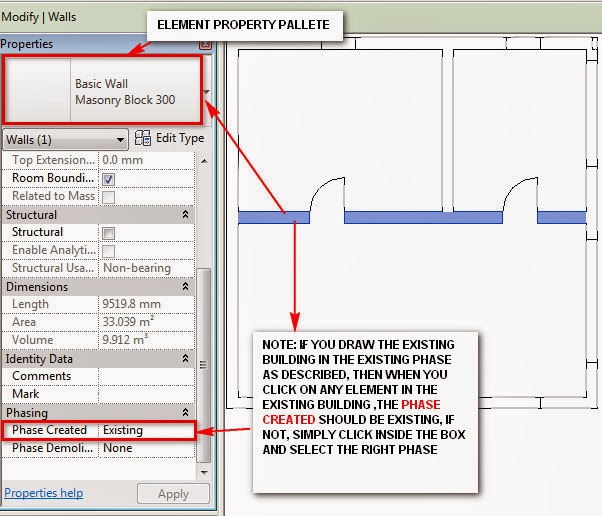
| Selecting Phase Option in the Elements Properties Palette |
.jpg)
Think about the Filter as the way you want your project to be named ,sorted ,organized and displayed in the views .
The Filter setting allows you to give names and set the graphical appearance according to how you want the elements to display in the views
For Archicad Users:
You have to open Renovation Filter Option Dialogue box.
You can Access the Renovation Filter Option by selecting it from the Renovation Filter drop down menu
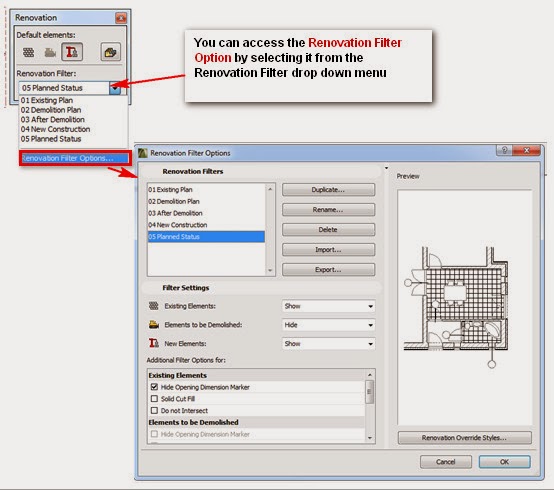 |
| Opening the Renovation Filter Option Dialogue box |
Renovation Filter : The idea here is that you are creating a view for the names you write in this box and these names will carry along the setting you apply to each Statuses. Although you have the option to duplicate,Rename , Delete or Import new names,but in my opinion these names are quite reasonable so I always work with them. At least I want one of my view to show the Existing Plan, another view to show the Demolition Plan, another to show the New Construction and another to show the Planned Status or Proposed Plan.

Filter Settings : After setting up the View names in the Renovation Filter, Select the 01 Existing Plan and go to Filter setting and select the options as shown in the image below. Click OK

Open the renovation tool box or go to Window - Palettes - Renovation. A small Renovation box will appear. You can keep this box at the corner of your drawing area because its a quick way to change the views or assign Status
Change the Renovation Filter to Existing and see what happens to your drawing. All elements that are assigned to "New Status" will disappear because we have hidden them in the Filter setting. See images below.


For Revit User
Phase Filter in Revit
By default, Revit gives you some option of Filter Names but for me these name are somewhat confusing so I always change these names to the ones I can easily work with. If you really understand how the Phase Filter works, then you can use your own names if not then I will recommend that you keep the default names and see how they affect your views.3. GRAPHICS OVERRIDES (Revit) / RENOVATION OVERRIDES STYLES ( ArchiCAD)
Graphics overrides allows you to change the display of elements in the views that you set up in the Phase Filters (Revit) / Renovation Filter (ArchiCAD). See Example below
ArchiACAD Users:


Revit Overrides
 |
| Phase Filter in Revit |
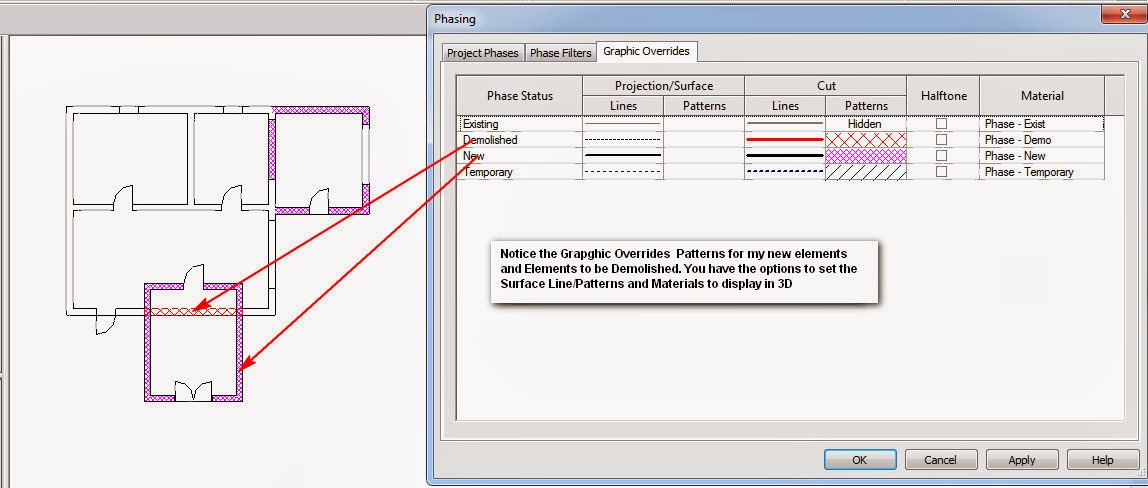 |
| Graphic Overrides in Revit |
Lessons Learnt:
- All elements must be assigned to the right Project Phase (Revit) / Renovation Status ( ArchiCAD)
- Create Filters names or use the default Filter names to display different views , For example ; Existing Plan , Demolition Plan and New Construction Plan
- Use Graphic Overrides( Revit ) / Renovation Overrides Styles (ArchiCAD) to tell how each Phase/ Status will graphically appeared in each view.